Where should you start when you get a robotic mower with boundary wire? The principle is just easy.
A boundary wire will come straight from the station and end in it. Therefore, it is usually the first to determine the position of your charging station, then map the entire mowing area by the wire, and lastly, get both installed with fixing screws and wire pegs as you planned.
The recommended procedures below are for your reference to get your lawn well-managed with the new Mr. Silence.
1/ Before the Installation
- Remove tall grass near the edge
Before you start to find a proper position to set up the charging station, it is recommended to manually remove the tall grass within 35cm from the edge of the lawn. That makes it much easier to lay the boundary wire.
- Locate the charging station
Since the charging station is the base camp where your robot gets charged and stands by after mowing sessions, it should be placed inside the lawn. You can find the position for it by following these principles:
- Flat, level groundwith no slopes or inclines in the direct vicinity
- No obstacles within 1m vertically
- Within easy reach of an outlet (100-240V AC)
- Not in corners or niches
- Not close to the wall, steps, or barriers higher than the lawn
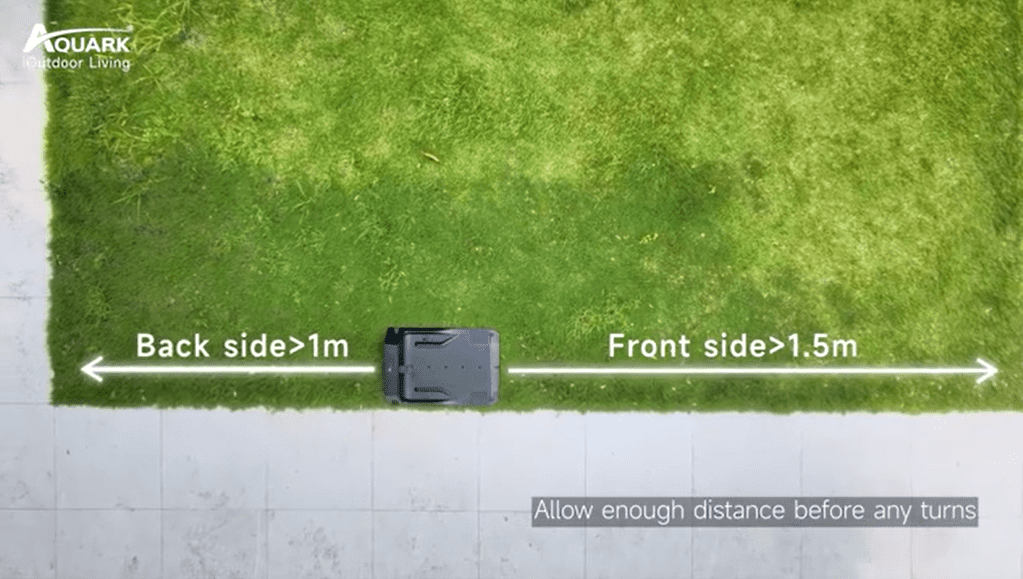
- There should be a minimum of 1.5m of wire coming from and 1m straight to the station before any turns.
- In the shade (if possible)
If you can’t find a roofed or shady place for the station, a robotic mower garage is an additional option and may be included in the package for different models.
How to lay the boundary wire in Mr. Silence’s installation?
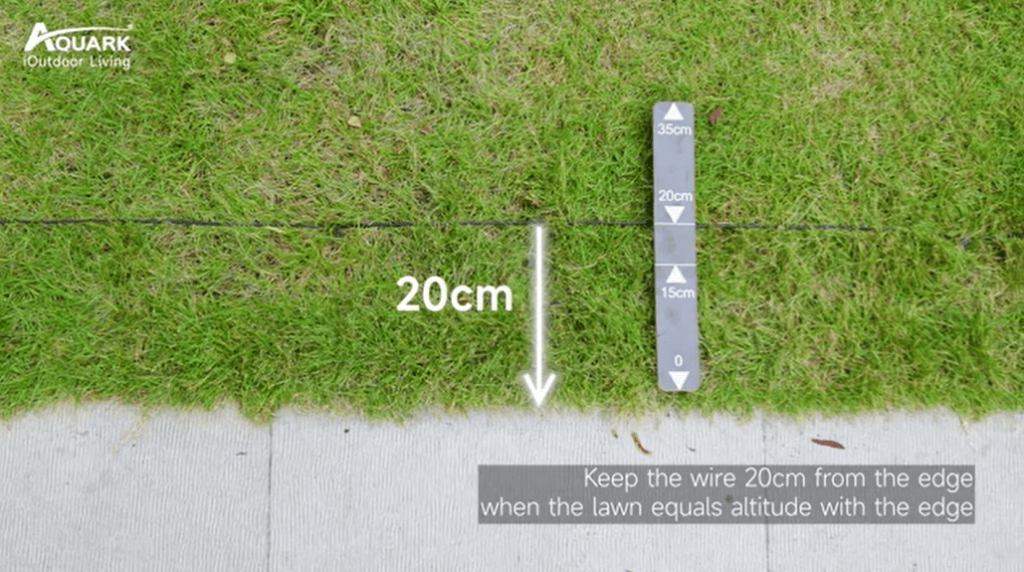
The boundary wire will define mowing areas for the robot and the robot will plan the S path zone by zone depending on its boundary sensors. Considering different boundary situations of your unique lawns, such as stone paving, fence, pool and so on, you’d better set it along the lawns but keep a certain distance from the edge. The distance may vary depending on the border of the lawn.
| What’s on the other side of the edge |
Distance from the edge (cm) |
| A wall/bush |
35 |
| A path of the same height |
20 |
| A river/underground pool |
100cm |
In the case of unregular backyards, the wire is turned at an angle greater than 30° if there are some corners and can’t be placed on slopes greater than 10°. The total length of the boundary wire should be less than 180m.
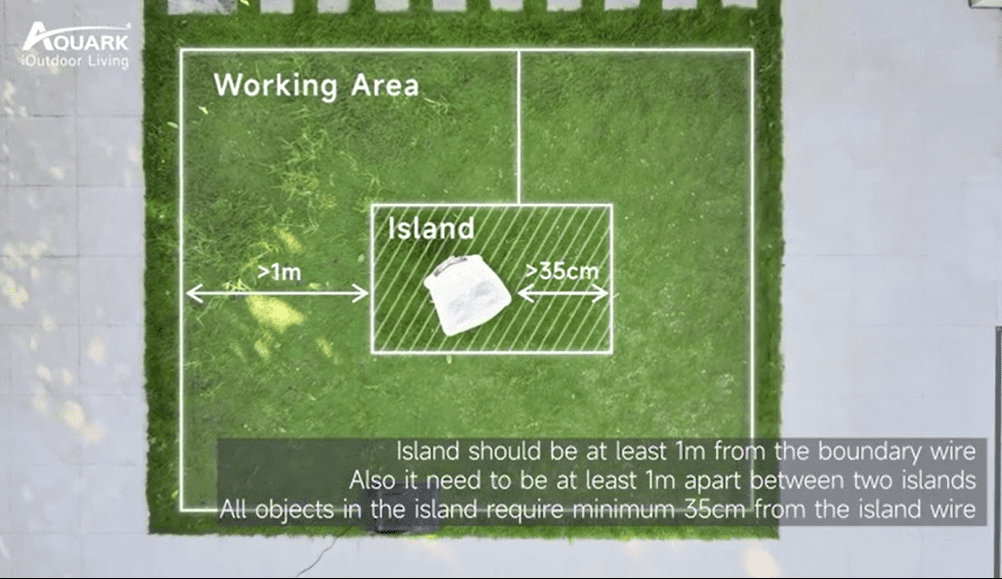
For different gardens, you may need to fence some stable objects off, especially flowerbeds, outdoor chairs, and ponds, which are hardly resistant to collisions like trees or stones. The robot can detect them by the built-in ultrasonic sensor and select a new direction automatically.
To prevent the robot from pruning the flowers, diving into the water, or breaking into other private areas, you can create an island using the boundary wire to keep the robot in the right direction.
The boundary wire is a single loop that starts and ends at the charging station so that the wire should not cross over at any point, especially when you create an island. You can put the boundary wire to and around the island, with the 2 sections to and from it close together and parallel less than 1cm.
There should be at least a 35cm distance between any object inside and the island wire. Every island should be more than 1m away from any others, as well as the boundary wire of your lawn.
What if you have a secondary garden without a connected passage? A single boundary wire can still work, but you need to move the robot manually between the main lawn and the secondary one in that case.
Although there are two separate mowing areas, there will still only be one boundary wire loop, the requirements of which are the same as creating an island.
The boundary wire is around the secondary areas with a parallel section connected with the main garden.
2/ Get Installed
- Secure the Charging Station
With the appropriate location ready, you can secure it easily by ensuring the arrow sign points to the inside of the lawn. The screws and the hex key are both provided in the packing of Mr. Silence for you to secure the charging station to the ground.
- Connect the Wire with the Station
There is a hole at the bottom of the charging station for the boundary wire to go through. After using a wire stripper to strip the end, you can insert the start of the wire into the hole and pass it through the station by about 10cm.
- Lay and Secure the Boundary Wire as Planned
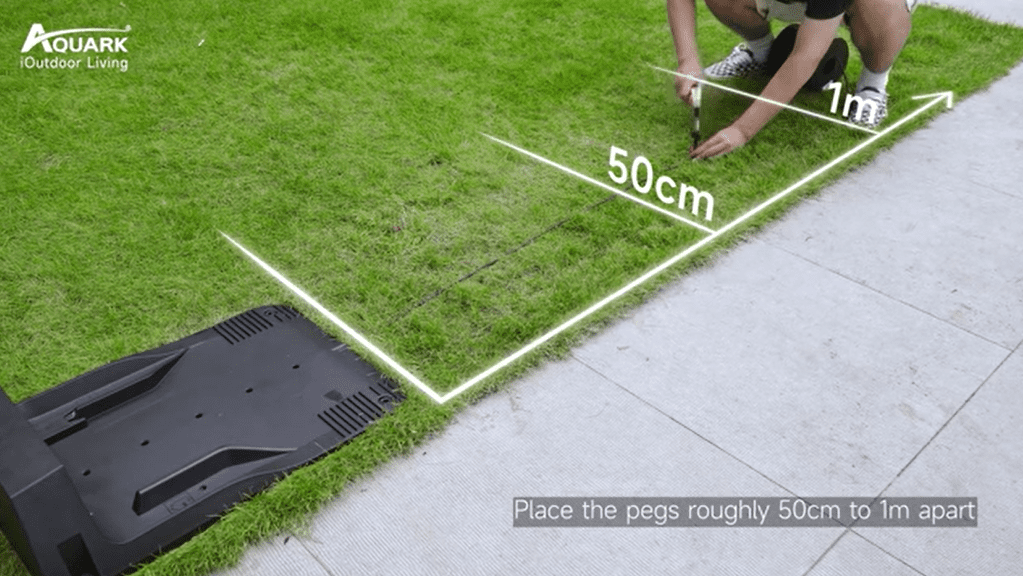
Fix the wire with pegs, which should be spaced roughly 0.5-1m apart, less for corners, turns, and dips. You can hammer the pegs all the way to the ground until there is no gap between the tight wire and the ground.
- Complete the Boundary Loop
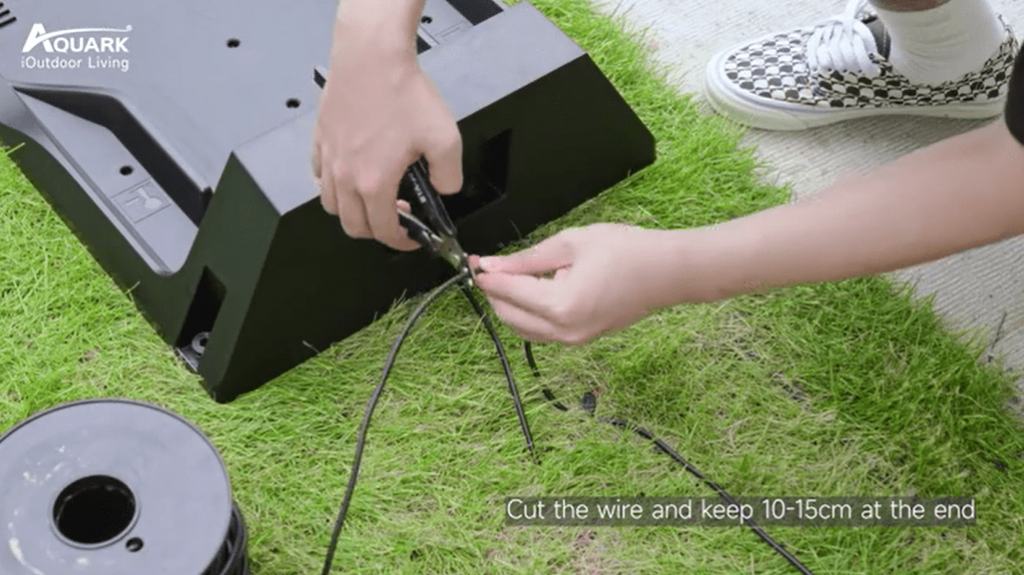
After you hammer all the pegs needed and complete the wire layout, cut the excessive wire, and keep 10-15cm at the end. Find the clamp port on the back of the charging station and put the start into the red clamp and the end of the wire into the black one.
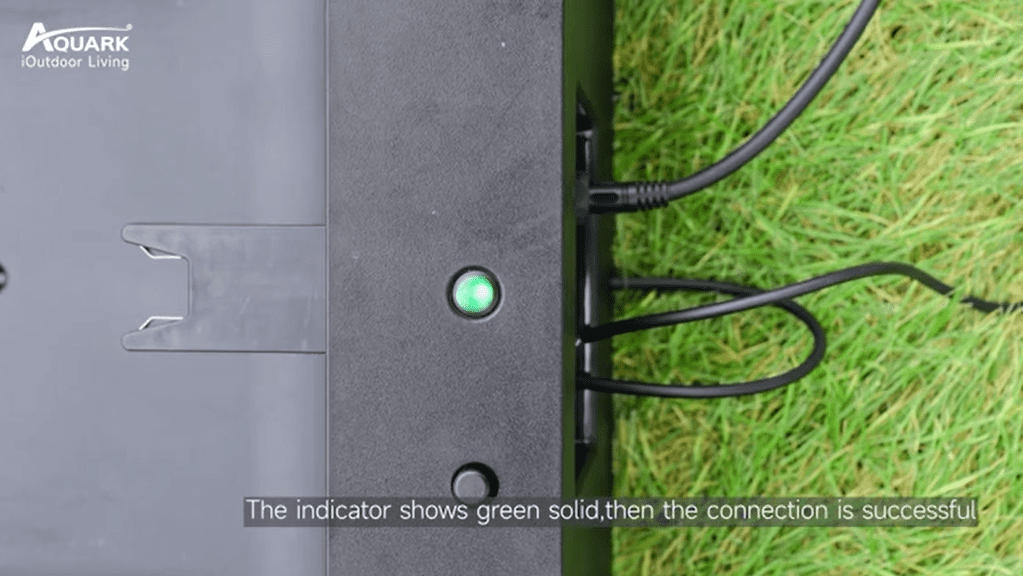
Power on the charging station to make sure the green indicator light is always on. That means you have successfully turned the boundary wire works.
3、 Using a Connector
Wire connectors can do your help with situations where an extra boundary wire is needed to complete the loop, or the original boundary wire need fixing or modifying.
If the boundary wire is broken, the indicator will be flashing green when powered on. You should check the break and repair it with a boundary wire connector.
Strip both ends of the wire and insert them into the connector. Press the connector and fix the boundary wire again with a peg to the ground. When the LED indicator returns to solid green, the new connection is successful.
Conclusion
The guide has outlined as many details as possible of the installation before you start the robotic mower. However, laying the boundary wire and fixing the station can be a process within 15 minutes and only happens at your first use. It is always a good idea to plan the whole map of your lawn edge before getting started with pegs and screws.
If you have any questions about the installation, feel free to ask our experts at Aquark.